

This guide explains how to migrate a single child site from a WordPress Multisite network to a standalone WordPress installation using WPvivid Backup & Migration Pro. It covers migration prerequisites, step-by-step export and import procedures, and key considerations for successful migration.
What Is Multisite Childsite Migration
WPvivid Backup & Migration Pro supports migrating an individual site (childsite) within a WordPress Multisite network to a separate single-site WordPress installation.
This feature is useful when you want to extract a subsite from a multisite network and run it independently as a standalone WordPress site.
Before Migration
Before migrating a childsite, ensure the following requirements are met:
- Prepare Target Installation
Ensure the target single site is a fresh WordPress installation ready to receive the childsite data. - Install WPvivid on Both Sites
WPvivid Backup & Migration Pro is installed and activated on both the source multisite network admin and the destination single-site installation. - Deactivate Security Plugins
Temporarily deactivate security and caching plugins on both sites, as they may write absolute paths that can interfere with migration.
How to Migrate a Multisite Childsite
Follow these steps to migrate a childsite from a multisite network to a standalone WordPress installation.
Note
This guide demonstrates the manual migration method, which is the most stable approach for childsite migration. You can also use auto migration or remote storage migration methods as needed.
This guide demonstrates the manual migration method, which is the most stable approach for childsite migration. You can also use auto migration or remote storage migration methods as needed.
Step 1: Export the Childsite from Source Multisite
- Go to the source multisite’s Network Admin
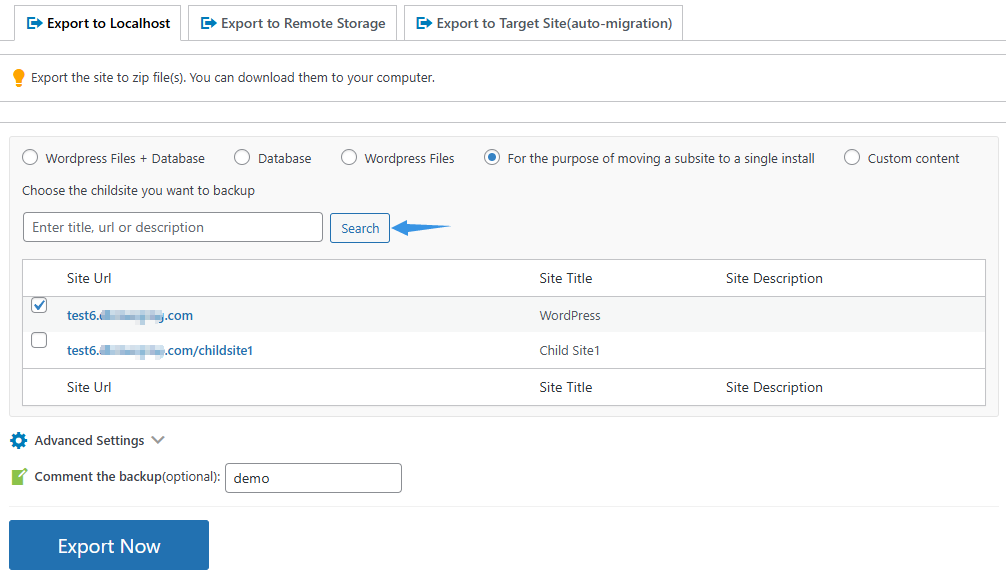
- In WPvivid Plugin → Export Site, click Export to Localhost (Web Server).
- In the Backup Content section, select For the purpose of moving a subsite to a single install.
- Enter a subsite title in the search field, or click Search directly to display all available subsites.
- Select the childsite you want to migrate from the list.
- Optionally add a comment for identification purposes.
- Click Export Now.
Step 2: Download the Export Files
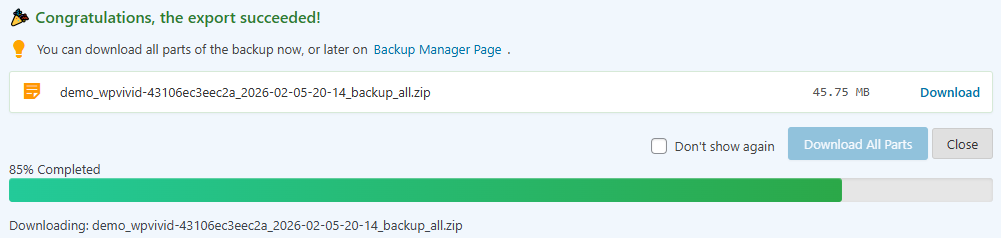
- After the export completes, you will see a successful message.
- Click the Download All Parts button to download the backup files to your computer.
- Keep all downloaded files together in the same location if the backup is split into multiple parts.
Step 3: Upload to Target Single Site
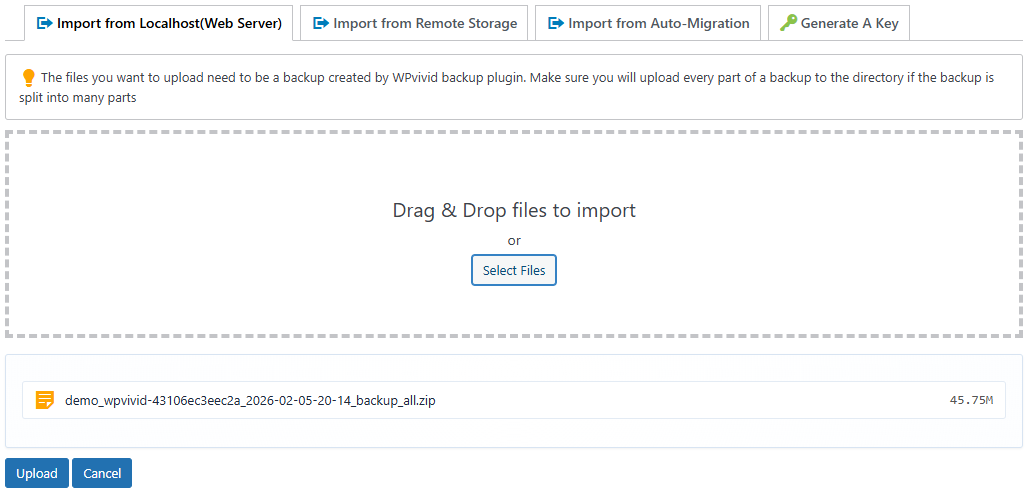
- Go to the target single site.
- In WPvivid Plugin → Import Site, click Import from Localhost (Web Server).
- Click Select Files or drag and drop all exported ZIP files into the upload field.
- Ensure all parts are uploaded at the same time if the backup is split into multiple files.
- Click Upload.
Step 4: Restore the Childsite

- After successful upload, you will see a successful message.
- Click Restore Now in the message to begin the restoration process.
- Wait for the restoration to complete.
- Verify the site is functioning correctly as a standalone WordPress installation.
What Gets Migrated
When migrating a childsite to a single install, WPvivid transfers:
- Childsite Database
All posts, pages, users, settings, and metadata specific to the selected childsite. - Childsite Content
Media uploads, custom content, and site-specific data from the childsite. - Themes and Plugins
Active themes and plugins used by the childsite. - Site Configuration
Childsite-specific settings and configurations (wp-config.php is not overwritten on the target site).
After-Migration Steps
After completing the childsite migration:
- Verify Site Functionality
Test all pages, posts, media, forms, and critical features to ensure they work correctly. - Clear Caches
Clear all caching plugins if any and server-level caches to ensure fresh content delivery. - Reactivate Security Plugins
If you deactivated security plugins before migration, reactivate them on the single-site installation.
Best Practices for Childsite Migration
For a successful childsite migration, follow these best practices:
- Perform a test migration in a staging environment before migrating to production when possible.
- Migrate to a fresh WordPress installation to avoid data conflicts and compatibility issues.
- Keep the source multisite network active until you have fully verified the migration was successful.
- Test all site functionality thoroughly after migration, including forms, media, plugins, and integrations.
- Ensure the target server has sufficient resources (disk space, memory, bandwidth) to handle the childsite independently.