


WPvivid Backup Pro allows you to store backups in Microsoft OneDrive Shared Drives, enabling you to select an available drive associated with your Microsoft account as a backup destination.
What Is OneDrive Shared Drives Integration?
The OneDrive Shared Drives integration retrieves available drives through the Microsoft Graph /me/drives API. You can select one of the returned drives to store your backups. The available drives depend on your authenticated Microsoft account.
Using an available shared drive provides a collaborative storage solution where backups can be accessed by authorized team members, making it useful for agencies, enterprises, and multi-admin environments.
Configuration Steps
1. Access Remote Storage Settings
- 1. Log in to your WordPress admin dashboard.
- 2. Navigate to WPvivid Plugin → Cloud Storage.
- 3. Select OneDrive Shared Drives from the list of available storage providers.
2. Authenticate with Microsoft OneDrive
- 1. Click the Authenticate with Microsoft OneDrive button.
- 2. Sign in using a Microsoft account that has access to the target Shared Drive.
- 3. Grant the required permissions to allow WPvivid to access the Shared Drive.
3. Configure Storage Details
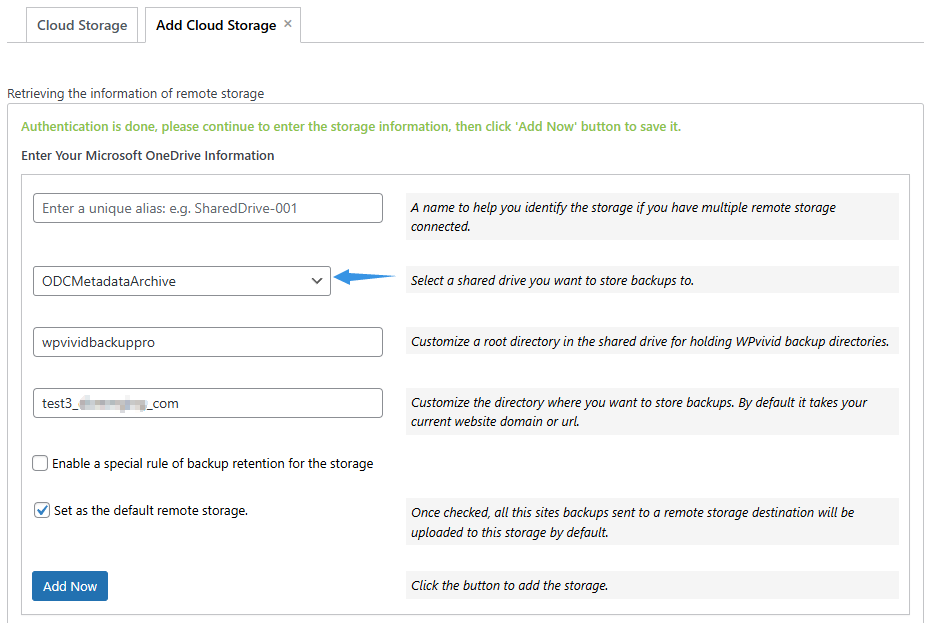
- 1. Unique Alias:
Enter a recognizable name for this storage connection (e.g.,OneDrive-Shared-001). - 2. Select a Shared Drive:
Select the Shared Drive where backups will be stored. - 3. Custom Parent Folder:
Define the parent folder name that will be created in the selected Shared Drive to store WPvivid backups (e.g.,wpvividbackuppro). - 4. Custom Subfolder:
Enter a unique folder name for the current website (e.g.,yourdomain_com). - 5. Backup Retention:
Specify how many backup copies to keep in the Shared Drive. Older backups will be removed automatically once the limit is reached. - 6. Set as Default Remote Storage:
Enable this option to use the Shared Drive as the default destination for all backups. - 7. Save and Connect:
Click Add Now to complete the configuration. The storage will appear in the remote storage list upon successful connection.