This guide explains how to configure WPvivid Backup & Migration Pro to store backups on Nextcloud, including connection setup, folder organization, and the differences between Nextcloud and WebDAV storage options.
What Is Nextcloud Integration?
WPvivid Backup & Migration Pro integrates with Nextcloud to store backups on your self-hosted Nextcloud server or managed Nextcloud instance. You can define custom folders for each website within the same Nextcloud account to keep backups well organized.
Path Example:
- 1.
.../wpvividbackuppro/site_a_com/ - 2.
.../wpvividbackuppro/site_b_com/
Nextcloud vs WebDAV
Both Nextcloud and WebDAV storage options in WPvivid Backup Pro use the WebDAV protocol for file transfer, but they differ in how the storage service is managed and integrated.
| Feature | Nextcloud | WebDAV |
|---|---|---|
| Storage Type | Self-hosted or managed cloud platform | Generic WebDAV-compatible server |
| Service Integration | Dedicated Nextcloud integration | Manual WebDAV configuration |
| Authentication | Username + password or app-specific password | Username + password |
| Folder Management | Supports custom parent and subfolders | Supports custom parent and subfolders |
| Ease of Setup | Easier setup for Nextcloud users | Requires correct WebDAV endpoint configuration |
| Best For | Users running or hosting their own Nextcloud server | Users connecting to third-party WebDAV services |
Which option to use:
- If you are using a Nextcloud server, selecting the Nextcloud storage option provides a more streamlined setup experience.
- If you are connecting to a generic WebDAV service, the WebDAV option offers broader compatibility with various providers.
- 1. Log in to your WordPress admin dashboard.
- 2. Navigate to WPvivid Plugin → Cloud Storage.
- 3. Select Nextcloud from the list of available storage providers.
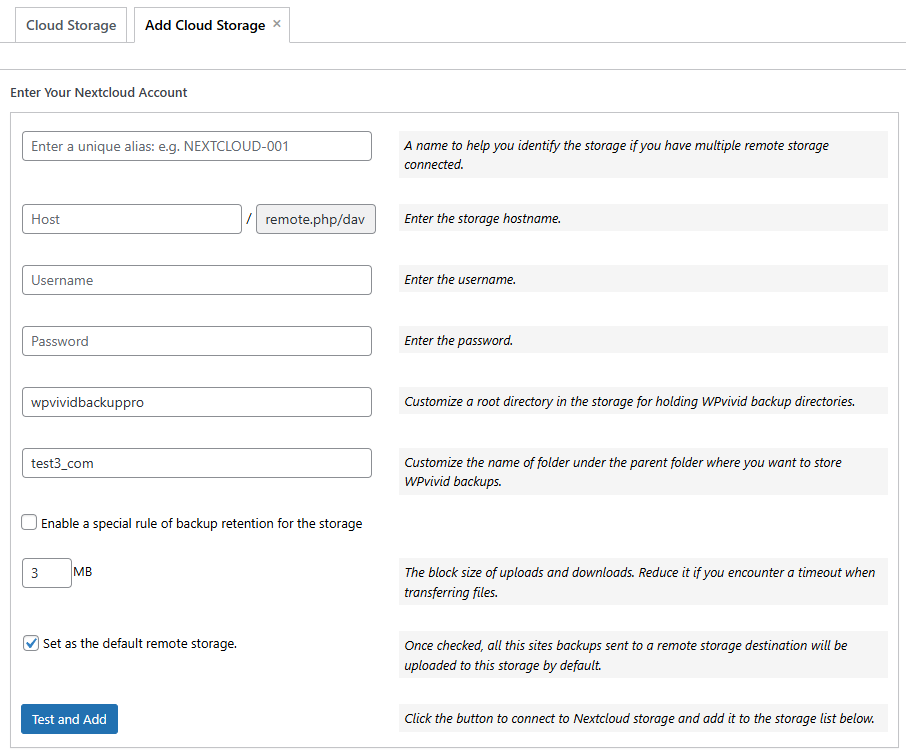
- 1. Unique Alias:
Enter a recognizable name for this storage connection (e.g.,Nextcloud-Server). - 2. Nextcloud Hostname:
Enter the full hostname of your Nextcloud server (e.g.,https://cloud.example.com). - 3. Username:
Enter the username of your Nextcloud account. - 4. Password:
Enter the corresponding password or an application-specific password. - 5. Custom Parent Folder:
Define a parent folder in your Nextcloud storage to hold WPvivid backup folders (e.g.,wpvividbackuppro). - 6. Custom Subfolder:
Enter a unique folder name for the current website (e.g.,yourdomain_com). - 7. Upload Block Size:
Set the block size for uploads and downloads. Lower this value if you experience timeouts or unstable network connections. - 8. Backup Retention:
Specify how many backup copies to keep in Nextcloud. Older backups will be automatically removed when the limit is reached. - 9. Set as Default Remote Storage:
Enable this option to use Nextcloud as the default destination for all manual and scheduled backups. - 10. Save and Connect
Click Add Now to save the configuration. Once connected successfully, Nextcloud will appear in the remote storage list. - Use HTTPS to secure backup data during transfer.
- Generate an app-specific password for better security.
- Ensure sufficient storage space is available on the Nextcloud server.
- Use unique subfolders for each website to prevent conflicts.
- Nextcloud storage is implemented using the WebDAV protocol.
- Ensure WebDAV access is enabled on your Nextcloud server.
- Firewall or server security rules may block large file uploads; adjust upload block size if needed.
Configuration Steps
1. Access Remote Storage Settings
2. Enter Nextcloud Account Information
Provide the connection details for your Nextcloud account.