

What Is Incremental Backup
WPvivid incremental backup is a backup strategy that captures only the files that have changed since the last backup, rather than backing up your entire site each time. This approach dramatically reduces backup time, storage consumption, and server resource usage while still providing frequent recovery points.
Key characteristics:
- Only modified, newly added, or deleted files are backed up
- Requires an initial full file backup as the baseline
- Reduces backup size and execution time
- Optimized for websites with frequent content updates
Database backups cannot be incremental. An incremental backup schedule includes a separate full database backup schedule that runs independently from your file backups.
How Incremental Backup Works
WPvivid incremental backup operates using a baseline-and-change tracking mechanism, understanding the incremental backup process helps you configure and restore effectively:
- Base Backup (Full Files Backup)
An initial complete backup of all WordPress files establishes the baseline - Incremental Backups
Subsequent backups capture only files that have been modified, added, or deleted since the base backup - Backup Chain
The series of incremental backups linked to one base backup forms a backup chain - Separate Database Backups
Database backups are handled separately and are always full backups (databases cannot be incrementally backed up)
Common Use Cases
Incremental backups are ideal for:
- Large Sites
Sites over 5GB where full backups are slow and resource-intensive - Frequently Updated Sites
Sites with daily or hourly content changes that need frequent backup points - Limited Bandwidth
Environments where uploading large full backups to remote storage is impractical - Storage Constraints
Situations where storage space is limited or expensive - High-Frequency Requirements
Need for hourly or multiple-times-daily backups - E-commerce Sites
Sites with constant transactions and content updates
How to Set Up Incremental Backups
Incremental backup schedules cannot run simultaneously with general backup schedules. Enabling incremental backups will disable any active general backup schedules. Make sure this aligns with your backup strategy before proceeding.
Step 1: Access Incremental Backup Settings
- Navigate to WPvivid Backup Pro → Backup Schedule
- Click the Incremental Backup tab
- You will see a default incremental backup schedule template ready for customization
Step 2: Configure Incremental Backup Schedule
Customize the incremental backup schedule based on your website requirements.
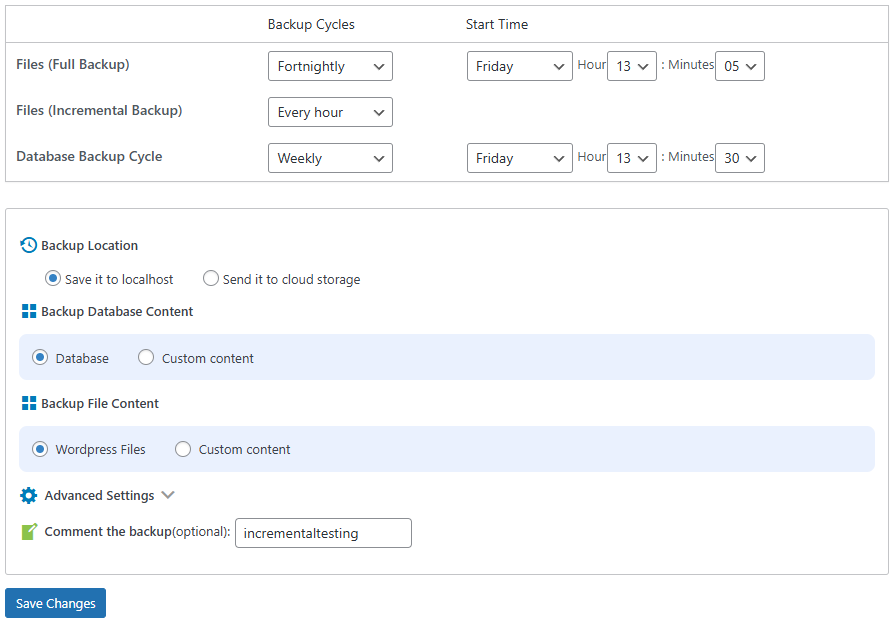
- Open schedule settings
Click the Edit button to expand and access all configurable options - Set backup frequency and timing
Configure backup cycles and start times for full file backups, incremental file backups, and database backups according to your update frequency and server capacity - Select backup destinations
Choose where backups will be stored, including local server storage and connected cloud storage services - Customize backup content
Select which files and database tables to include, and exclude unnecessary folders such as cache directories and temporary files to reduce backup size - Add a schedule comment (optional)
Enter a descriptive note to help identify the purpose and configuration of this backup schedule - Save your configuration
Click Save Changes to apply your customized settings
Step 3: Enable the Incremental Backup Schedule
- Activate the schedule
After reviewing your settings, click Enable to turn on the incremental backup schedule - Run an initial full backup (optional)
You may start a full backup immediately when enabling incremental backups. This creates an instant restore point in case issues occur before the first scheduled backup runs
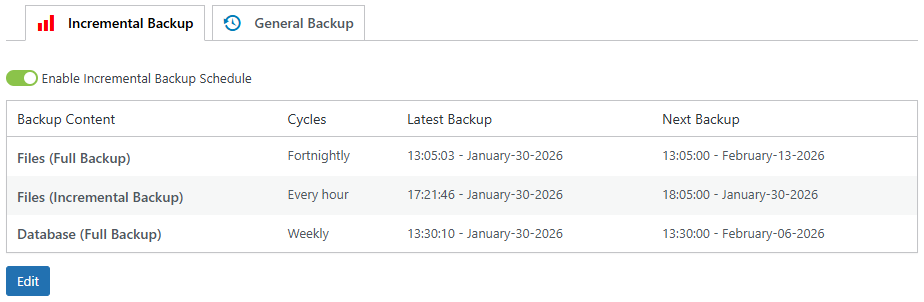
Step 4: Verify Schedule Status
After enabling the schedule, confirm that it is running correctly.
- The schedule status displays as Enabled
- The Next Backup time is shown for full file backups, incremental backups, and database backups
Incremental backups only begin after a full file backup has been created. If you want incremental backups to start immediately, set the full file backup start time to a few minutes after the current time.
How to Restore from Incremental Backups
Restoring from incremental backups is performed in two stages: first restore your website files, then restore your database to match the selected restore point.
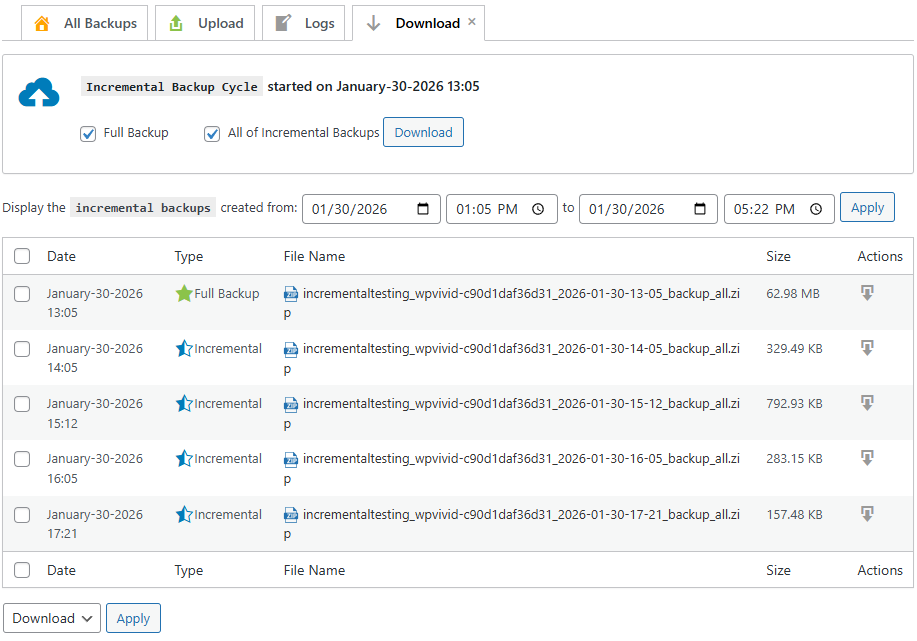
Step 1: Access Incremental Backup List

- Go to WPvivid Backup Pro → Backup Manager
- Click the Localhost or Remote Storage tab depending on where your backups are stored
- Use the filter dropdown and select Incremental
- Click the Scan button to load all available incremental backup cycles
You can distinguish file backups and database backups by checking the icon in the Content column. The folder icon represents file backups, while the database icon represents database backups.
Step 2: Select Your Restore Point
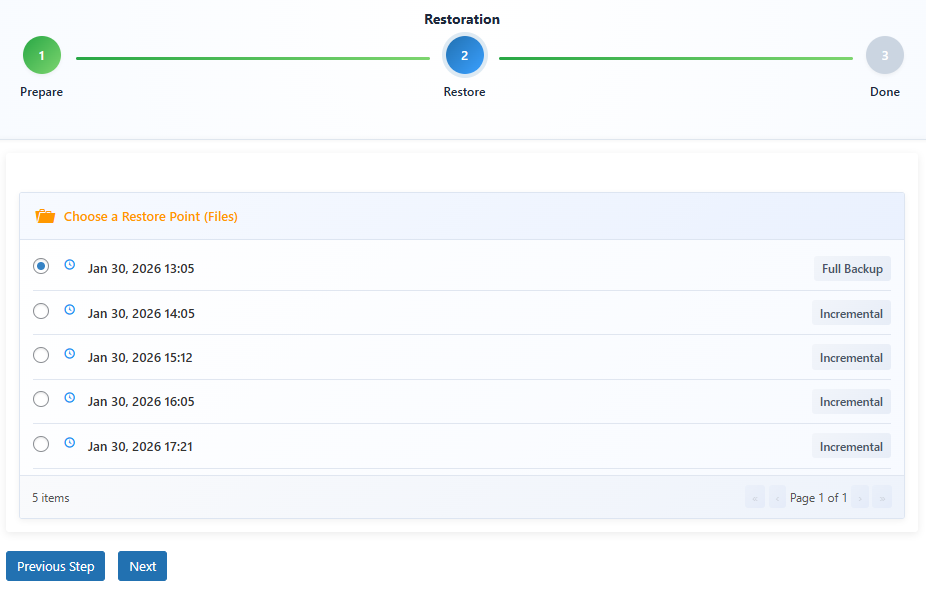
- Locate the incremental backup that represents the point in time you want to restore
- Click the Restore button for the selected backup cycle
- If the backup is stored in remote storage, click Retrieve the backup to localhost to download it to your server
- Select the specific incremental restore point from the list
- Click Restore Now to begin file restoration
- Wait until the restoration process completes successfully
When restoring an incremental backup (for example, Node 3), WPvivid automatically restores all required backups in sequence: first the full file backup (Node 1), then the earlier incremental backup (Node 2), and finally the selected restore point (Node 3). This ensures your files are restored to the exact state of your chosen point in time.
Step 3: Restore Database
After file restoration completes, restore the database to match the same time period.
- Return to the incremental backup list in Backup Manager
- Locate the database backup closest to your selected file restore point
- Click Restore for the corresponding database backup
- Wait for the database restoration process to finish
Step 4: Verify Restoration
After both file and database restoration have completed, verify your website functionality.
- Open your website homepage and important internal pages
- Confirm that content matches the selected restore point
- Test critical site functions (forms, checkout process, user login, membership features, etc.)
- Clear all caches (WordPress cache plugins, server cache, and CDN cache)
- Ensure the website loads and operates normally
How Incremental Backups Are Managed
WPvivid incremental backups are organized by backup cycles. Each cycle starts with a full file backup and includes all subsequent incremental backups created until the next full backup is generated.
Manage incremental backup
To view and manage incremental backups in WPvivid.
- Navigate to WPvivid Backup Manager → Localhost or Remote Storage
- Filter by backup type to see incremental backups
- The backup date in the backup list is the date of files full backup of that cycle
- Click the View icon to see a full list of files full backup and all incremental backups from that cycle.
- Deleting an incremental backup cycle means to delete the entire backup set within that cycle
Retention and Cleanup
Retention rules for incremental backups are applied at the backup cycle level.
- Retention settings control how many backup cycles to keep
- When a new full backup creates a new cycle, the oldest cycle is deleted if retention limit is reached
- This prevents orphaned incremental backups without their base backup
Incremental Backup Settings Best Practices
Follow these recommendations for optimal incremental backup configuration:
- Weekly Full, Hourly Incremental, Daily Database
If you are unsure which configuration to use, this standard configuration balances protection, performance, and storage for most sites - Use Remote Storage
Always send incremental backups to remote storage for off-site protection, especially for critical sites - Monitor Backup Chain Length
Weekly full backups keep chains manageable (168 hourly incremental maximum) - Test Restoration
Periodically test restoring from incremental backups to verify the process works correctly - Avoid overly aggressive schedules:
Adjust backup frequency based on your server capacity to maintain website performance.