

By default, WPvivid Backup Pro saves backups to a standard directory on your cloud storage. However, for better organization and security, the Pro version allows you to define a Custom Parent Folder and Site-Specific Subfolders.
Why Use Custom Backup Folders?
- 1. Organization:
Keep backups for different websites in separate, clearly named folders. - 2. Management:
Easily identify which files belong to which domain within your cloud storage (Google Drive, Dropbox, etc.). - 3. Security:
Avoid overwriting data when multiple sites connect to the same cloud account.
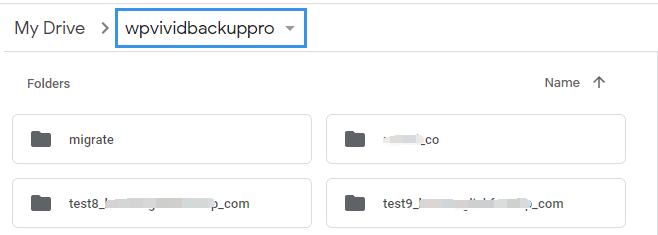
Folder Structure Overview
WPvivid Pro uses a two-tier folder structure:
- 1. Parent Folder:
The main directory in your cloud storage root (Default: wpvividbackuppro). - 2. Subfolder:
A private folder inside the parent directory for a specific site (Default: www_yourdomain_com).
Example Path: Cloud Root > wpvividbackuppro > www_yourdomain_com
How to Set Up Custom Folders
During Initial Storage Connection
When you add a new cloud storage alias (e.g., Google Drive, Dropbox, Amazon S3):
- 1. Navigate to WPvivid Plugin > Cloud Storage.
- 2. Select your desired storage provider.
Custom Parent Directory: Enter the name for your main backup folder.
Custom Subfolder: Enter a unique name for the current website’s backups. - 3. Complete the authentication process to save the settings.
Editing Existing Storage Settings
If you have already connected your storage and want to change the folder names:
- 1. Go to the Cloud Storage tab in WPvivid.
- 2. Locate your storage in the Storage List.
- 3. Click the Gear (Edit) Icon next to the storage alias.
- 4. Update the Folder Name or Subfolder Name fields.
- 5. Click Save Changes.
Notes
1. If you don’t specify a name, WPvivid will automatically create a subfolder based on your domain name to prevent data mixing.
2. If you use the same Google Drive for 10 different sites, ensure each site has a unique Subfolder Name so they don’t interfere with each other’s backup retention rules.
3. Ensure the cloud account you are using has “Write” permissions to create these directories in the root folder.
4. While editing your custom folder, you can also define the Block Size for uploads and set specific Backup Retention rules (how many backups to keep) for that specific storage.