WPvivid Backup for MainWP extension can be used together with WPvivid Backup & Migration Free to create & manage your website backups directly from MainWP dashboard.
- Create Backups for Child Sites
- Create Backup Schedules and Sync to Child Sites
- Configure WPvivid Backup Plugin settings and Sync to Child Sites
Install WPvivid for MainWP Extension
Please follow this step-by-step guide to install WPvivid for MainWP extension on your MainWP dashboard site.
Install WPvivid Backup & Migration Free
1. Go to your MainWP Dashboard > Plugins > Install Plugins

2. In the Search form, enter “WPvivid or WPvivid Backup Plugin” and select the plugin.
3. Select the child sites where you wish to install the plugin.
4. Enable activate plugin after installation and Overwrite existing version(recommended) option then click on the Complete Installation.
Note: Make sure you will hit the “Sync Dashboard with Child Sites” button on your MainWP dashboard if you have WPvivid Backup Plugin or WPvivid Backup Pro installed previously on the child site or whenever you make any changes to a child site, for example, install/deinstall, activate/deactivate WPvivid Backup Plugin.
Now, WPvivid Backup Plugin should be installed and activated on your child sites.
Create Backups Manually for Child Sites
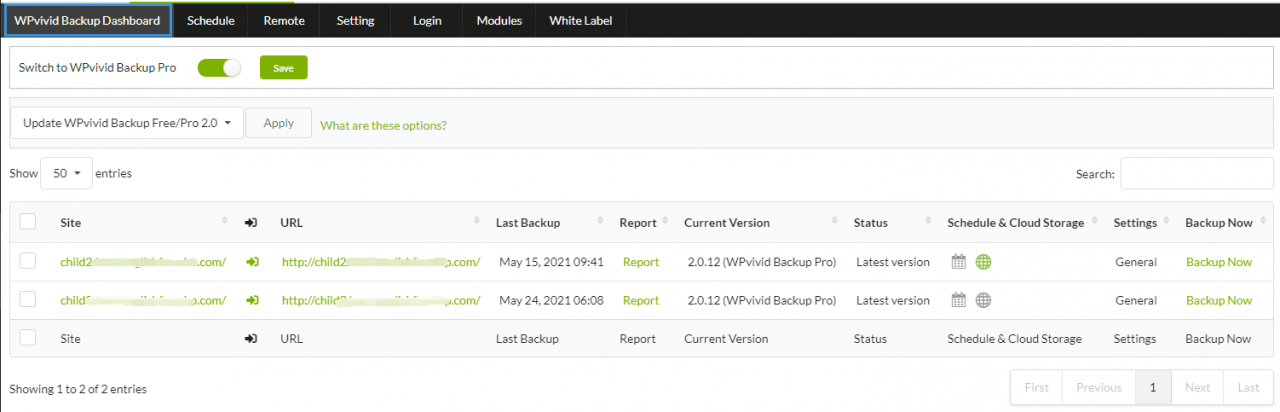
To create a manual backup for a child site, go to WPvivid Backup Dashboard and click Backup Now of the child site.
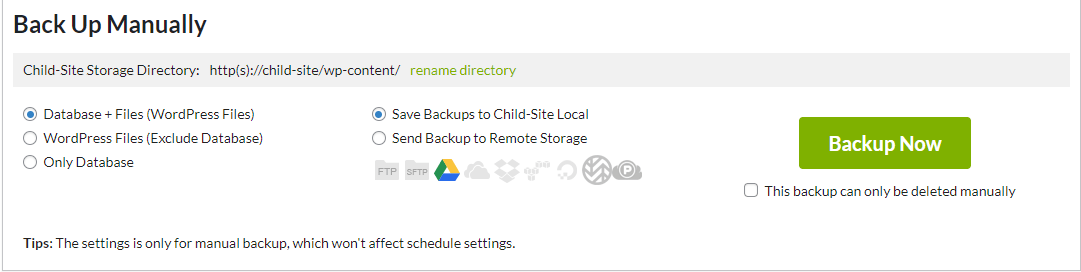
On the page that opens, select the backup type: Database + Files(the entire site), WordPress files only, or database only.
Select backup location: Localhost(web server) of the child site, or cloud storage.
Once done, click Backup Now button to start backing up the child site.
Set up Backup Schedules for Child Sites
To set up backup schedules for child sites, go to the Schedule tab, check the option: Enable backup schedule.
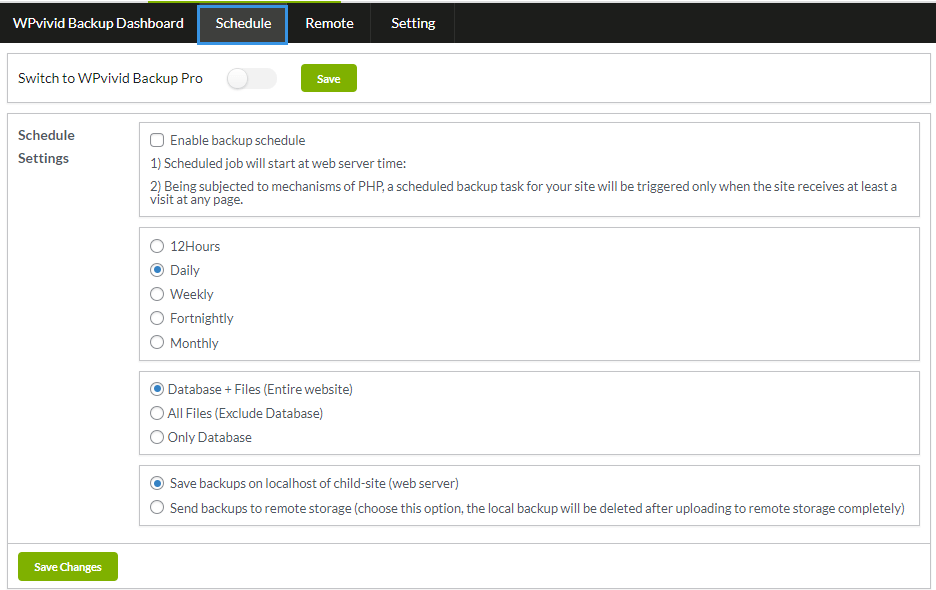
Next, choose the backup cycle:
- Every 12 hours
- Daily
- Weekly
- Fortnightly
- Monthly
Once done, select what to back up – the entire site(all files + database), database only or files only.
Then choose where you want to store the backups.
- Store them on localhost of child site(web server).
- Remotely store them to FTP, SFTP, Amazon S3, DigitalOcean Spaces. Note that when you choose this option, the local backup will be deleted after uploading to remote storage completely.
Once done, click the Save Changes button at the bottom of the page.
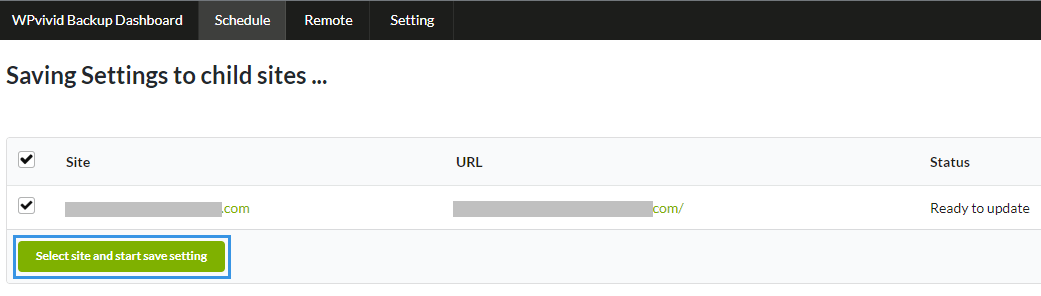
Lastly, select the child sites you want to sync the backup schedule to and click Select site and start saving settings button to start the process.
Configure WPvivid Plugin Settings for Child Sites
To configure WPvivid plugin settings for child sites, go to the Settings tab and edit General settings and Advanced settings,
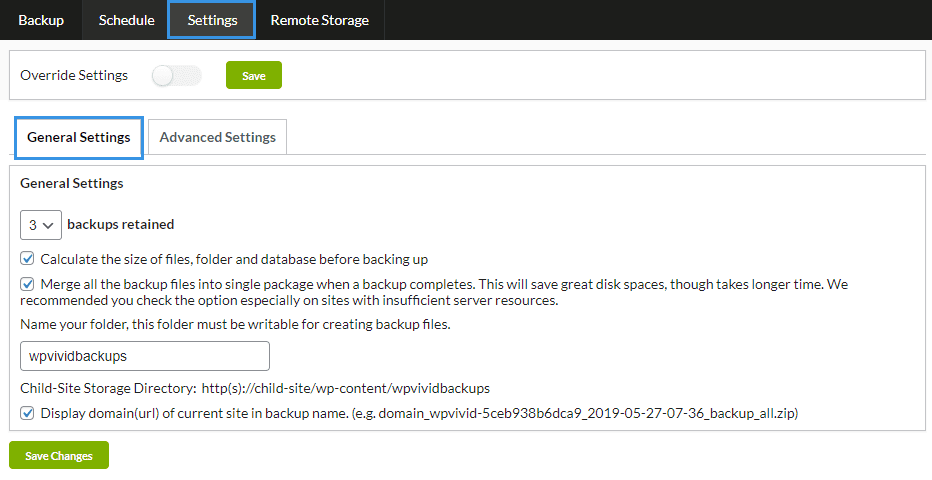
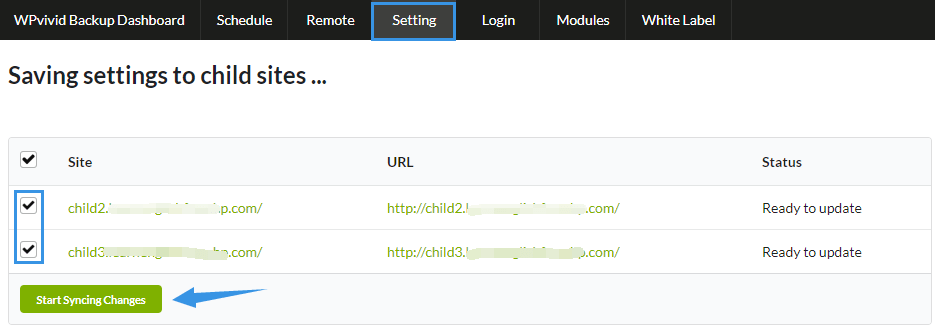
Once you are done with the settings, click the Save Changes and Sync button at the bottom of the page.
On the page that opens, select the child sites you want to the settings to take effect and save the changes. Before you create and sync schedules to child sites.
Configure Settings Status for A Child Site
To sync the global configurations, namely, backup schedules and plugin settings to the site, you should always make sure that the Settings status of the sites is set to ‘General’.

There are two different settings type:
General: Only when a child site is set to General, you are able to sync the global configurations, namely, backup schedules and plugin settings to the site, or the site will not show up in the child site list when you choose to sync a global configurations to all your child sites.
Individual: When you see a child site’s settings status is Individual. It stands for that the site is using it’s own backup schedules, plugin settings and remote storage.
How to Configure Settings Status for A Child Site?
From your MainWP Dashboard > Manage Sites on the left-side bar > Click on the site to open the site overview > WPvivid Backups tab.
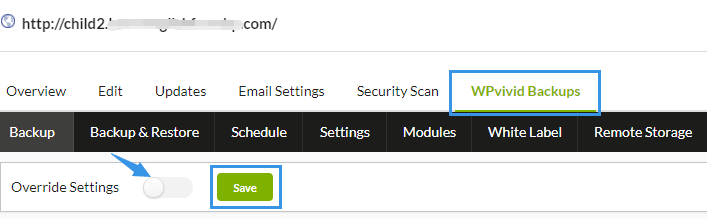
On the top of the page, switch off/on the Override Settings option for the child sites and click the Save button, then click on the Sync Dashboard with Child Sites button on the page.
Note:
Switching off the Override Settings option will set the site’s settings status to General.
Switching on the Override Settings option will set the site’s settings status to Individual.